

简介
Tinker: n. 〈英〉小炉匠,补锅匠,修补匠
Tinker 是微信官方开源的 Android 热修复框架,支持在无需升级APK的前提下更新 dex, library and resources 文件。它也就是今年9月24才刚刚开源,几天功夫star数就超过3000,可见在开发者中的影响力有多大,也说明这是一个刚需。
Tinker GitHub: https://github.com/Tencent/tinker
使用步骤
一个小坑
很多人遇到的第一个错误就是提示 tinkerId is not set ,这个在tinker-sample-android的app/build.gradle 中默认设置为Git的提交版本号,如下
1 | def getTinkerIdValue() { |
如果不是通过git clone方式下载的就可能出现这个错误,其实可以简单粗暴的方式解决,那就是在app/build.gradle中把tinker id写死:
1 | def getTinkerIdValue() { |
下面介绍一下如何一步步的把Tinker集成到自己的项目中,以及会遇到哪些问题该如何解决。
一、工程根目录的build.gradle中添加依赖
在项目的build.gradle中,添加tinker-patch-gradle-plugin的依赖
1 | buildscript { |
此时如果gradle Sync不成功可能是因为没有加入 jcenter仓库
1 | buildscript { |
二、在app/build.gradle中的dependencies节点添加依赖
1 | dependencies { |
三、复制官方sample工程app/build.gradle中的其他相关配置
把官方 tinker-sample-android 工程中的app/build.gradle复制到自己的app/build.gradle中,特别是最下面的task 代码块,否则无法生成patch。
四、替换自己的Application类
这一块需要特殊说明一下,tinker为了达到修改应用自己的Application的目的,使用代码框架封装继承DefaultApplicationLike的方式来实现对Application的修改,主要为了减少反射的使用和提高兼容性,具体说明参考 Tinker Wiki:自定义Application类。
在替换更改之前,强烈建议先把项目中的Application类做个备份。因为需要采用Annotation自动生成Application,原来的Application类需要删掉。
然后我们修改项目的 Application ,使之继承DefaultApplicationLike; 这块的确有点奇葩,这个DefaultApplicationLike不是继承自Application,需要用注解来设置项目中真正的Application,Tinker插件会自动生成真正的Application。
1 | (application = "com.cuc.android.aps.MyApplication",//通过注解,由tinker自动生成MyApplication |
上边的com.cuc.android.aps.MyApplication就是真正的Application,不用我们自己写,是自动生成的。然后修改manifest.xml将application指向com.cuc.android.aps.MyApplication就行,开始会报错,build一下项目就好了。
五、在刚改好的 ApplicationFromTinkerLike 中重载onBaseContextAttached方法
并在该方法中增加以下代码调用初始化tinker
1 |
|
或者,我们可以直接将Sample工程中的文件(特别是Utils包下的)拷贝到我们自己的工程中,就像我一样,方便后期使用。比如SampleResultService、TinkerManager这几个类

然后重载onBaseContextAttached方法,可以像我一样写成下面这样
1 |
|
至此,自定义Application,也就是将Application中的实现移动到SampleApplicationLike中已经完成。
六、可以开始写测试patch的代码啦
使用下面代码来load patch
1 | TinkerInstaller.onReceiveUpgradePatch(this.getApplication(), Environment.getExternalStorageDirectory().getAbsolutePath() + "/patch_signed_7zip.apk"); |
在自己的工程中增加两个按钮,其中一个按钮用来显示EditText中的内容,另一个按钮用来加载补丁,在加载补丁按钮点击事件中执行加载patch的操作,为后期修复代码bug做准备,代码为:1
2
3
4
5
6
7
8
9
10
11
12
13
14
15
16
17Button toastInfo = (Button) top.findViewById(R.id.toastInfo);
toastInfo.setOnClickListener(new View.OnClickListener() {
public void onClick(View v) {
//清除补丁
Toast.makeText(SysUtils.getApp(),"clean patch!",Toast.LENGTH_LONG).show();
Tinker.with(SysUtils.getApp()).cleanPatch();
}
});
Button loadPatchButton = (Button) top.findViewById(R.id.loadPatch);
loadPatchButton.setOnClickListener(new View.OnClickListener() {
public void onClick(View v) {
//加载补丁(加载成功以后patch文件会自动删掉)
TinkerInstaller.onReceiveUpgradePatch(SysUtils.getApp(), Environment.getExternalStorageDirectory().getAbsolutePath() + "/patch_signed_7zip.apk");
}
});
打patch包的步骤
1、调用assembleDebug编译原始包
AndroidStudio 命令行下运行
1 | ./gradlew assembleDebug |
编译过的包会保存在build/bakApk中。然后我们将它安装到手机,可以看到补丁并没有加载。
2、修改代码,添加新功能或者更改功能
例如在MainActivity中添加一个I am on patch onCreate的Toast.
3、然后修改build.gradle中的参数
将步骤一编译保存的安装包路径拷贝到tinkerPatch中的tinkerOldApkPath参数中,根据需要也得同时修改tinkerApplyResourcePath ,tinkerApplyMappingPath 。
1 | /** |
4、调用tinkerPatchDebug, 生成补丁包
1 | ./gradlew tinkerPatchDebug |
补丁包与相关日志会保存在/build/outputs/tinkerPatch/中,我们将其中的patch_signed_7zip.apk推送到手机的sdcard中。
1 | adb push ./app/build/outputs/tinkerPatch/debug/patch_signed_7zip.apk /storage/sdcard0/ |
5、运行app,执行LOAD PATCH代码块
如果看到patch success, please restart process的toast,即可锁屏或者KILL 应用进程。
6、重新启动App
我们可以看到,补丁包的确已经加载成功了。
使用Tinker的注意事项
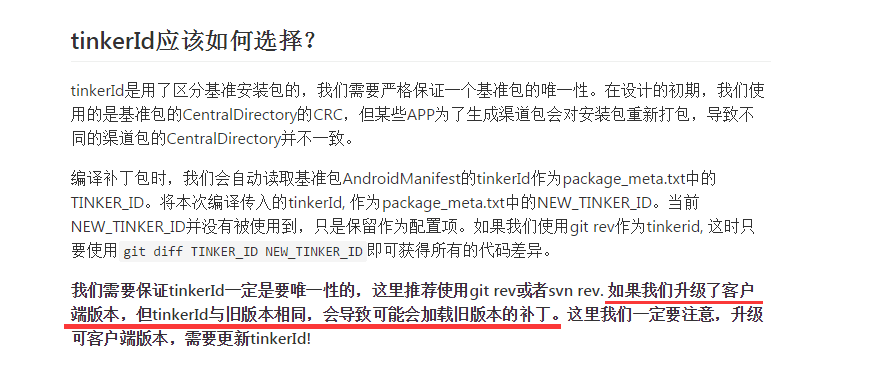
- 1、Tinker_id的大版本升级问题
- 2、如果生成patch失败,并且原因如下:
1 | Warning: ignoreWarning is false, but we found loader classes are found in old secondary dex. |
那么需要把相应的报错类声明在项目的keep_in_main_dex.txt 文件中,保证它编译时会被放置到主dex中。参考Tinker Issue #96 。
【参考资料】
- Tinker 官方接入指南
- 微信Android热补丁实践演进之路
- 微信Tinker的一切都在这里,包括源码(一)
- 【腾讯Bugly干货分享】微信热补丁Tinker的实践演进之路
- 将Tinke集成到自己的项目
- Android 微信热修复Tinker接入过程以及使用方法
- Tinker 逆向分析